
Featured Photo by Rowan Freeman on Unsplash
Last Updated: 1st April 2024
Introduction
In the rapidly evolving world of e-commerce, TikTok Shop has emerged as a significant platform, blending social media’s virality with the immediacy of online shopping. As merchants and creators look to leverage this powerful tool, understanding the logistics options available is crucial for success. This article delves into the intricate logistics landscape of TikTok Shop, offering a comprehensive overview of the types of shipping options, including platform versus seller shipping, and Fulfilled by TikTok Shop (FBT).
We will compare platform and seller shipping, highlighting the differences between both to help sellers make informed decisions that best suit their business model. For these two options, this article will walk you through a detailed step-by-step guide for order management in the TikTok Seller Centre providing practical insights for both newcomers and seasoned sellers on the platform, ensuring efficient and effective logistics handling.
Additionally, we will break down the Fulfilled by TikTok Shop service, exploring its functional offerings, regional availability, cost implications, and the advantages it brings to the table. Whether you’re a small business owner looking to expand your reach or a creator aiming to monetize your content, understanding TikTok Shop’s logistics options can significantly impact your strategy and success on the platform.
Shipping Options
What is the difference?
Platform Shipping (“Shipped via Platform”) is the default option for all sellers on TikTok Shop. With this option selected, TikTok will handle the collection and delivery of your orders however you will be responsible for storage/warehousing.
Seller Shipping (“Shipped via Seller” or “Seller Own Fleet”) is an invite-only option available to sellers that meet certain requirements. You will manage the logistics end-to-end, including warehousing, delivery, returns and customer service. Please check the “Seller Shipping” section below for requirements.
Fulfilment by TikTok (FBT) is only available in the UK and US. TikTok will manage everything including, warehousing, packing, delivery and even customer service. This option incurs additional fees, which can be viewed in the FBT section below.
Platform Shipping
Available in all markets.
How to process orders through platform shipping?
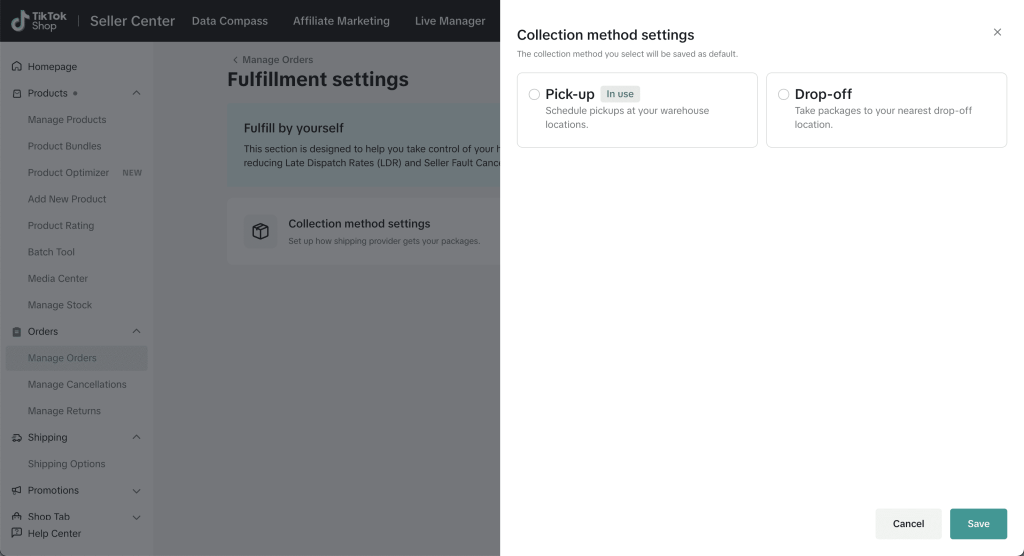
Step 1: Set Up Collection Method
To start shipping, you need to set up your default collection method first. You only need to do this the first time you ship orders or if you decide to change your default collection method.
To set your default collection method navigate to your TikTok Seller Centre > Orders > Manage Orders > Fulfilment Settings.
Then select Pick-up or Drop-off as seen on the screen below.
Step 2: Select Your Orders
After customers have successfully placed orders, find them in your Seller Centre under Orders > Manage Orders. Here you can see all of your orders and their various statuses.
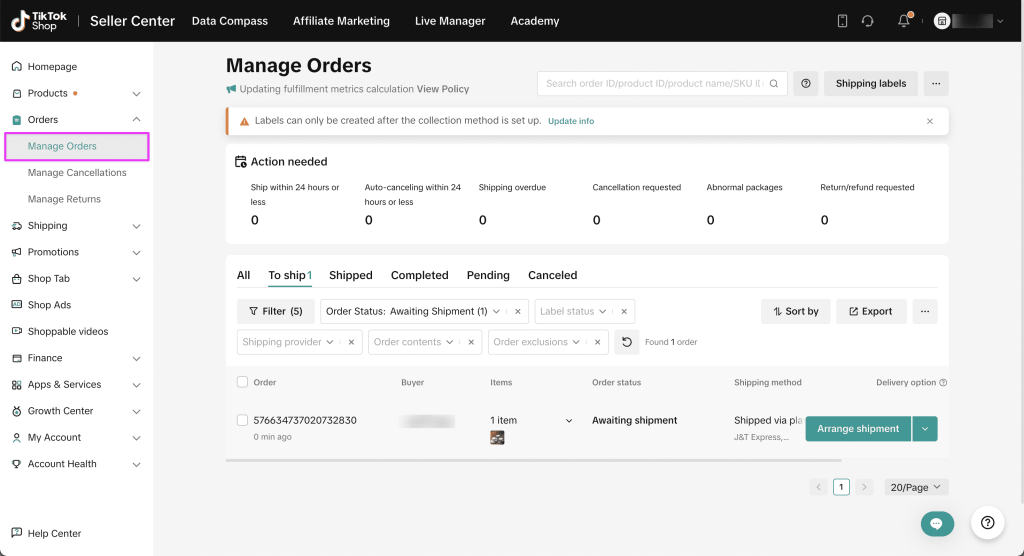
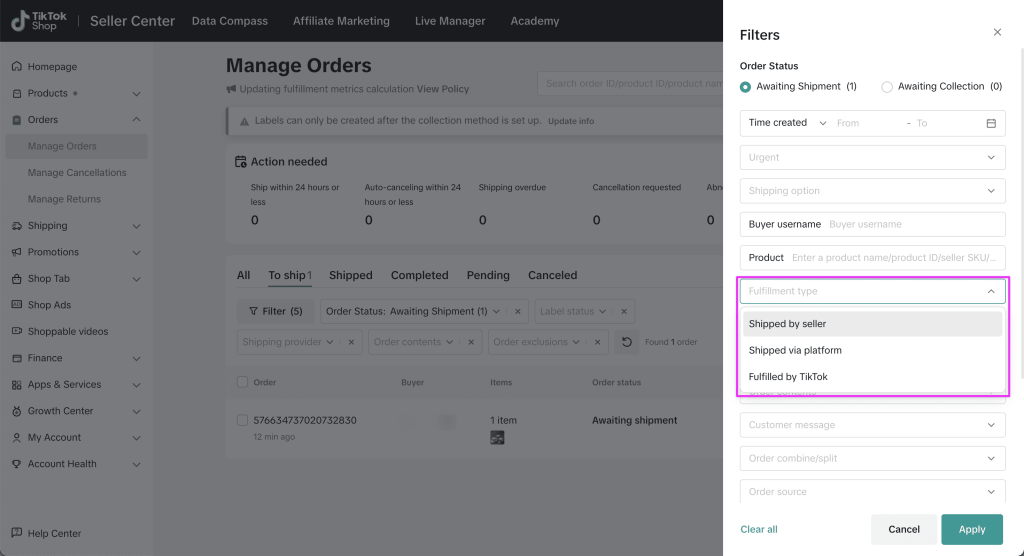
Use the filter options to refine your orders to ‘Fulfillment Type: Shipped via Platform’ and select ‘Order Status: Awaiting Packing’ to identify new orders that haven’t been processed yet.
Step 3: Arrange Shipping
To process orders, mark the checkbox in front of the single or multiple orders you wish to select, then click ‘Arrange Shipment’.
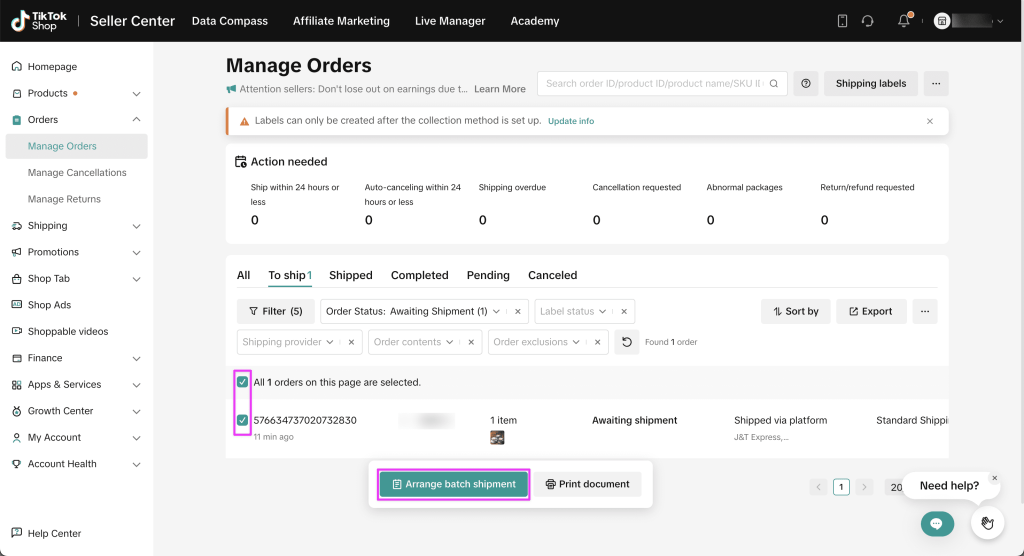
Important: Sellers are required to click on ‘Arrange Shipment’ within 3 working days of order creation.
If you do not click ‘Arrange Shipment’ within 3 working days of order creation, TikTok will automatically cancel the order.
Step 4: Print Shipping Labels
TikTok generates shipping labels automatically in PDF format at your chosen size (A6 or A5), you can choose whether to print a packing or picking list to help with warehouse management.
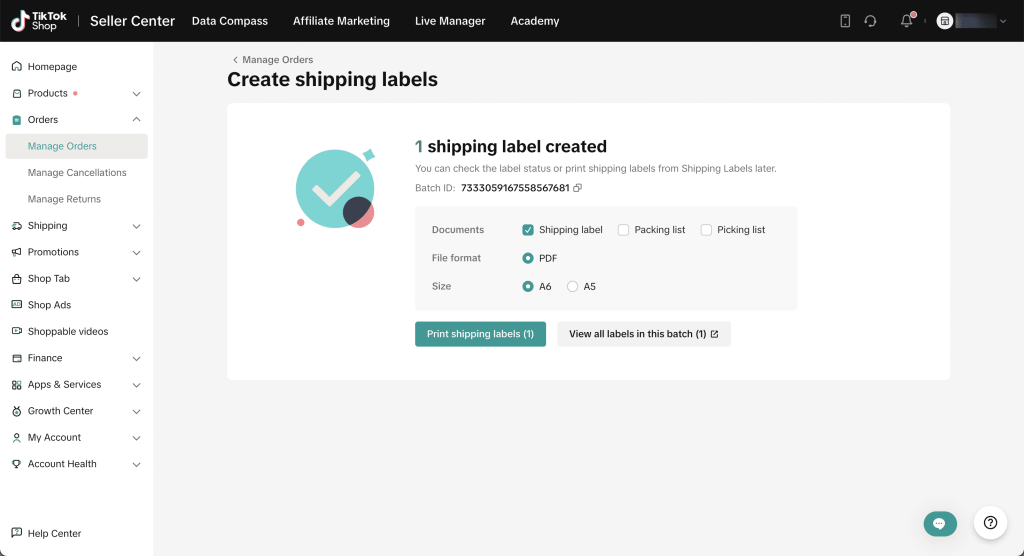
Click print shipping labels to continue the process. If you encounter other issues (or need to re-print) shipping labels, go to Manage Orders > Shipping Labels to check the status of your shipping labels and re-print if necessary.
Step 5: Handover to Logistics
After your orders are packed and ready, based on your collection method you either drop off the package(s) or wait for the logistics partner to collect.
The logistics providers will scan your package(s) to confirm they have received them, and the order status will automatically update to ‘Shipped.’ You can track your order status, ‘In-Transit’ or ‘Delivered’, in the TikTok Seller Center.

Seller Shipping
Available in all markets.
What is Seller Shipping?
Seller Shipping (also known as “Seller Own Fleet” or “SOF”) entails fulfilling orders through your own logistics network. In order to be eligible for Seller Shipping the seller must meet at least one of the following criteria:
- Goods which require installation (e.g. ceiling fans)
- Goods which require special handling (e.g. temperature sensitive goods such as fresh/frozen food)
- Dangerous goods (e.g. batteries, lighters)
- Bulky or heavy goods which surpass the Platform Shipping limit
Here’s a simple comparison of the two options:
| Function | Platform Shipping | Seller Shipping |
|---|---|---|
| Arrange Shipment | Sellers can arrange shipment through the platform and select pick up or drop off at their convenience | Sellers have to arrange their shipments independently |
| Tracking Number | Automatically created by TikTok | Manually inputted by the Seller |
| Shipping Label | Printed via TikTok Seller Centre | Printed independently from TikTok |
| Tracking Details | Shown in the TikTok Seller Centre | No tracking details for Seller Shipping1 |
| Delivered Status | Automatically reflected in TikTok the Seller Centre | Manually updated by the seller, including proof of delivery |
| Shipping Fee Calculation | Auto-calculated by TikTok | Manually calculated by the seller through their shipping template2 |
| COD | Supported | Not Supported |
How to process orders through seller shipping?
Step 1: Select and Export Your Orders
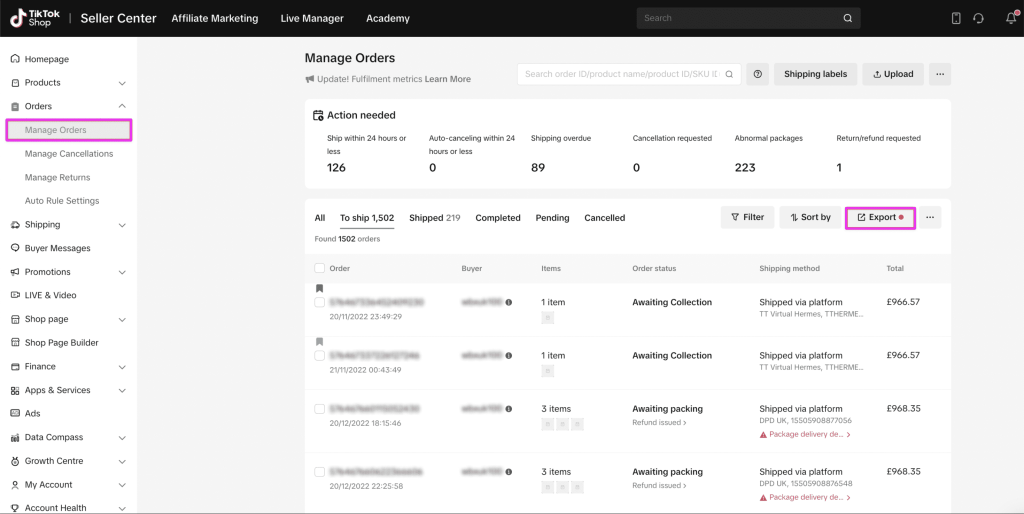
After customers have successfully placed orders, find them in your Seller Centre under Orders > Manage Orders. Here you can see all of your orders and their various statuses.
To handle the shipping for these orders by yourself, navigate to the ‘To Ship’ tab, and click the ‘Export’ button to export orders.
In the ‘Export Orders’ tab, select the export orders range as ‘All Shipped by Seller orders awaiting packing.’ Proceed to export your orders and download the file.
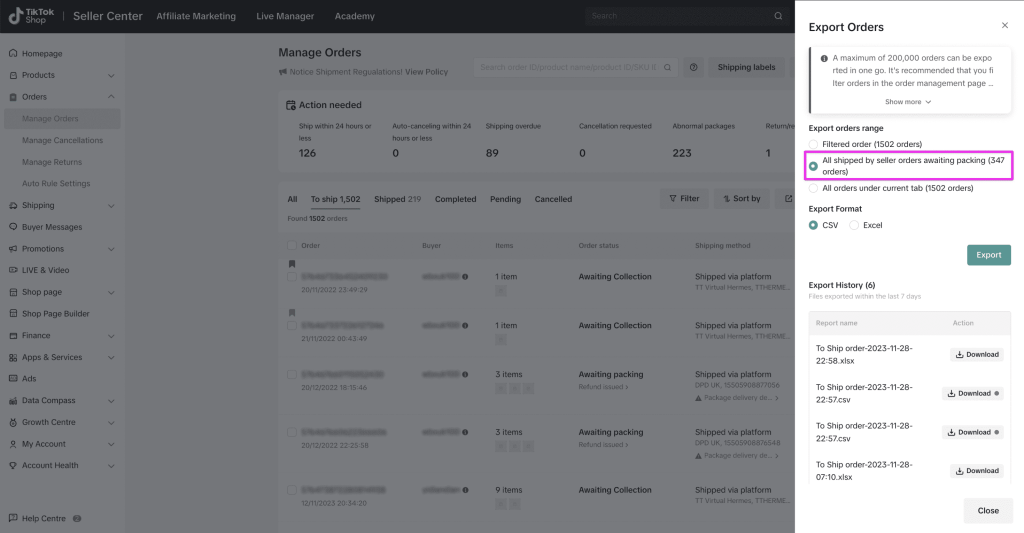
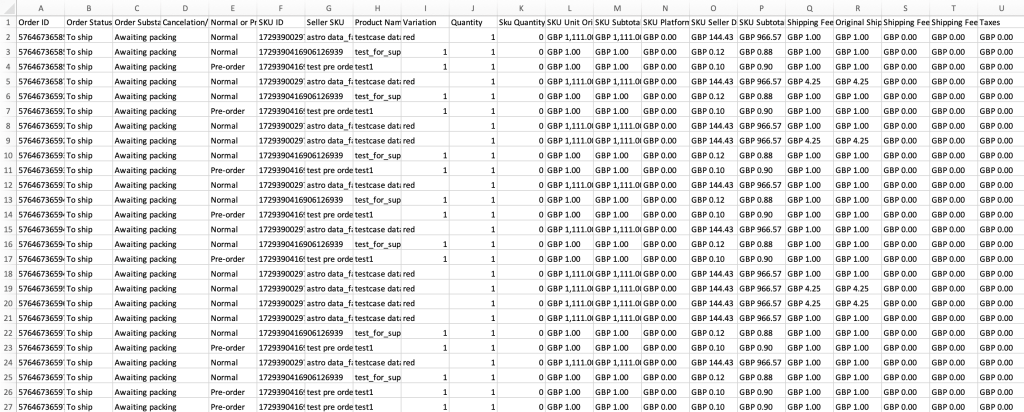
You will find a spreadsheet containing all order information, including order ID, SKU ID, quantity, and customer shipping details. Please note that a maximum of 200,000 orders can be exported in one go.
Step 2: Pack and Ship Your Orders
Once you have the order information, get your orders ready and arrange shipments with your selected shipping providers.
Step 3: Upload Shipping Information
After completing the shipment arrangements, you must upload shipping information from your shipping providers to the TikTok Seller Centre. This informs the platform that you have fulfilled the orders. There are two ways to upload shipping information:
Upload Shipping Information in Bulk
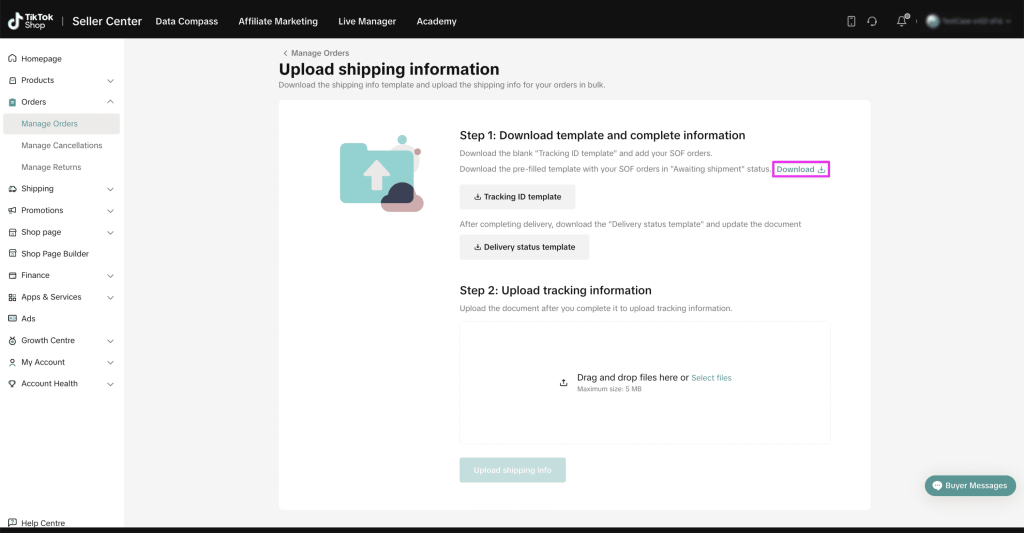
To upload shipping information in bulk, visit the Manage Orders page. In the upper right corner, click ‘Upload’ to download the template. Step-by-step instructions will guide you through the process.
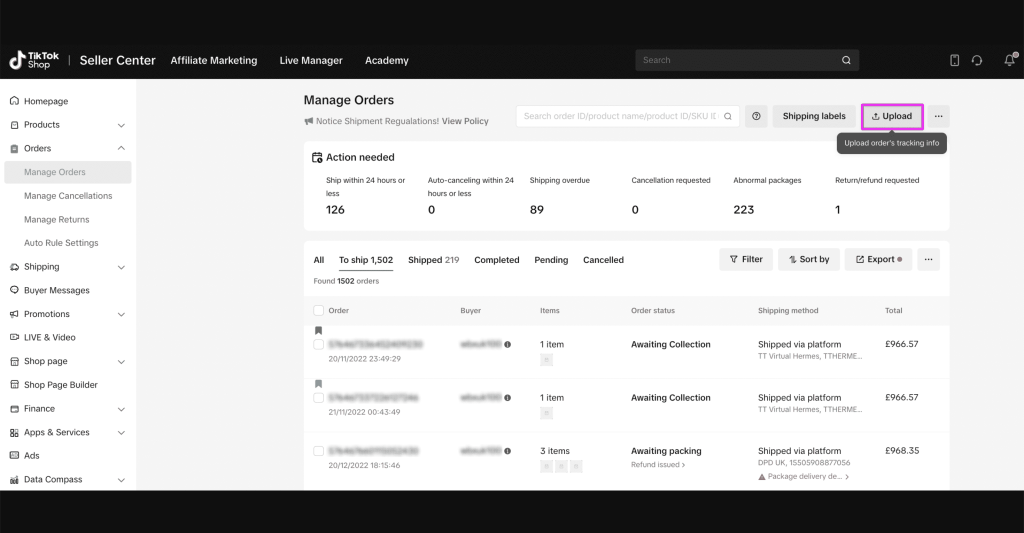
Click ‘Download’ to get the template for orders shipped by the seller in awaiting shipment status. Alternatively, you can select ‘Download Template’ for a blank template.
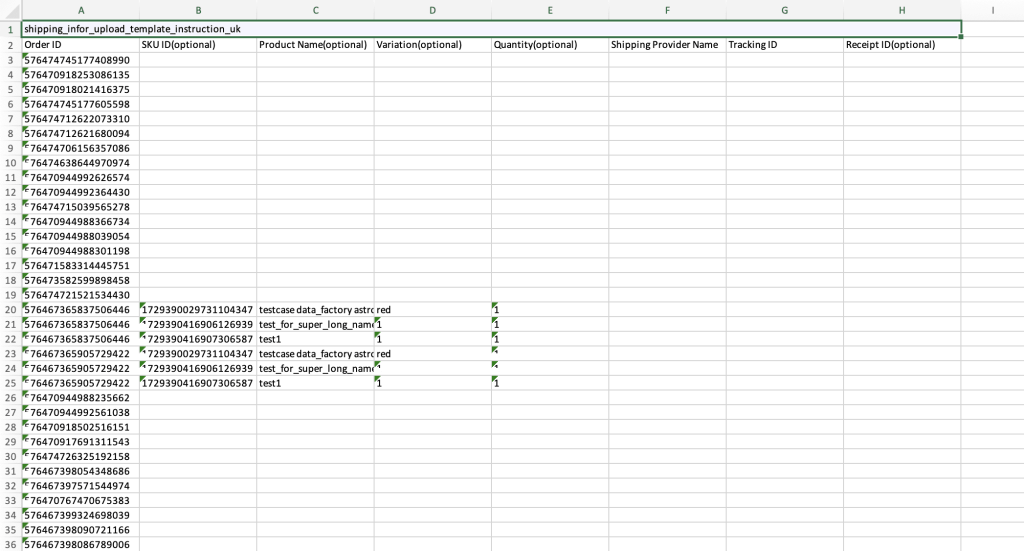
Open the downloaded spreadsheet, which includes columns like Order ID, SKU ID, Product Name, Variation, Quantity, Shipping Provider Name, Tracking ID, and Receipt ID.
You need to add Shipping Provider Name and Tracking ID.
Be cautious not to delete or move any columns, as doing so may result in errors during the upload process.
To upload the completed spreadsheet, click ‘Select File’ and choose your spreadsheet. Then, click ‘Upload Shipping Info.’

After uploading, the system will display all the orders and prompt you if there are any issues with the tracking number or shipping provider information. Review the details, make necessary changes, and click ‘Submit Packages’ to confirm the shipping information.

Upload Shipping Information One-By-One
For individual uploads, you can visit the Manage Orders page and filter ‘Shipped by Seller’ orders.

You can easily multi-select orders by adding checkmarks to the desired orders and then click ‘Add Tracking Info’.
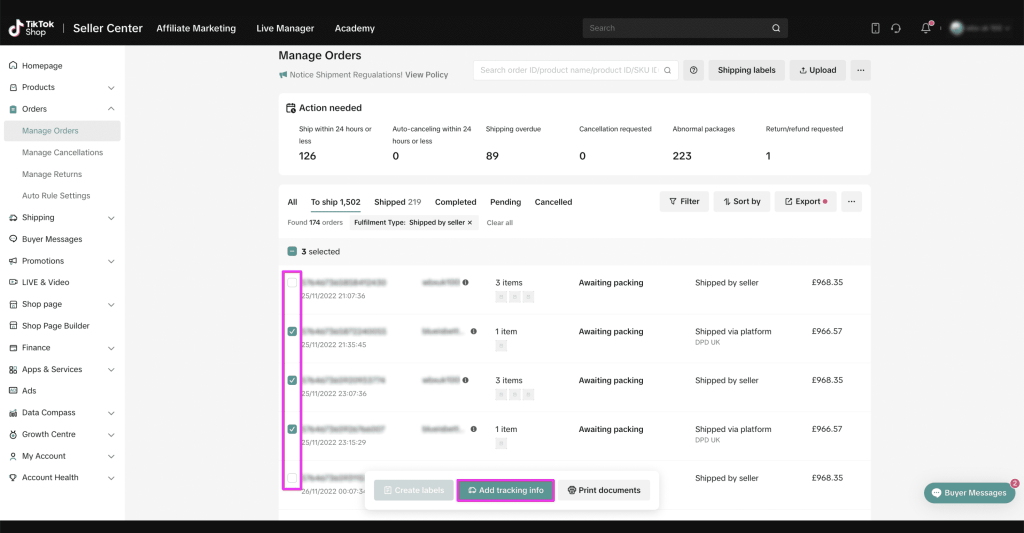
The system will redirect you to the Add Tracking Info page, where you can input the tracking ID and select the shipping provider. Once completed, click ‘Submit Package’.

The system will display all the orders and prompt you if there are any issues with the tracking number or shipping provider information. Review the details, make necessary changes, and click ‘Submit Packages’ to confirm the shipping information.

Step 4: Update Delivery Status
After your orders have been delivered, it’s crucial to update the delivery status, indicating whether the delivery was successful or unsuccessful. There are two methods to update the delivery status.
Update Delivery Status in Bulk
To upload shipping information in bulk, go to the Manage Orders page. In the upper right corner, click ‘Upload’.

Two templates will be available for download. Choose the ‘Delivery Status Template’ to download the spreadsheet.
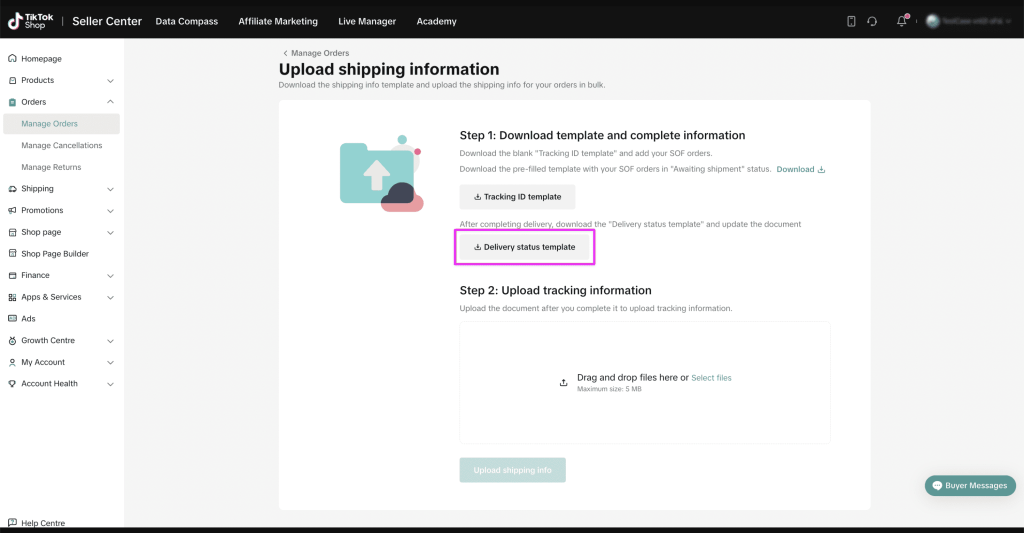
Open the downloaded spreadsheet, which includes columns such as Package ID, Order ID, Product Name, Variation, Quantity, Shipping Provider, Tracking ID, Delivery Result, and Delivery Failed Reason.
Add information to the Delivery Result and Delivery Failed Reason columns. Verify that the correct status is uploaded, and be careful not to delete or move any columns, as this may result in errors during the upload process.
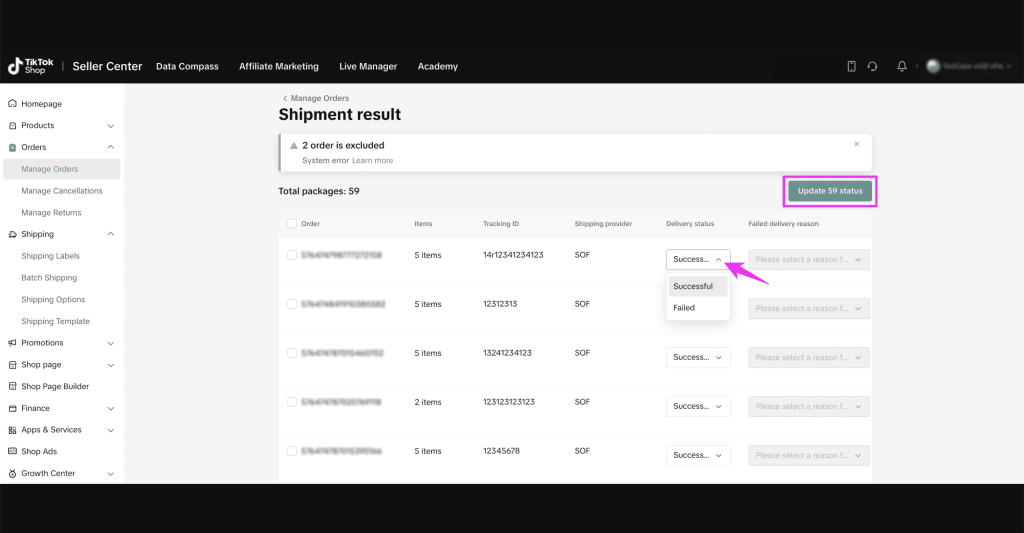
Once the spreadsheet is complete, upload it to Seller Center to update the delivery.

The system will prompt you to review the upload status. Check the details, make necessary changes, and click ‘Update Status’ to confirm the delivery status.
Update Delivery Status One-By-One
You can also update the delivery status one by one. Just go to the Manage Orders page and filter ‘Shipped by Seller’ orders.

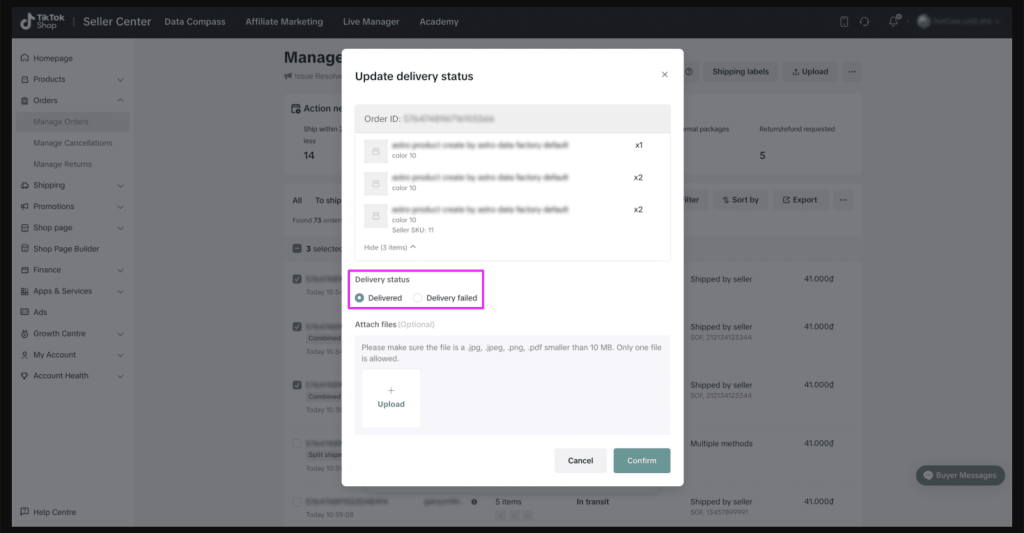
Select the orders you want to update and click ‘Update Delivery Status’.

You will be redirected to the Update Delivery Status page, where you can choose the delivery status and attach photos. Once done, click ‘Confirm’.
Fulfilled by TikTok Shop (FBT)
Available in the UK and US only.
What is Fulfilled by TikTok Shop (FBT)?
Fulfilled by TikTok Shop (FBT) offers warehousing, delivery, and customer service solutions exclusively in the UK and US. This service is aimed at enabling sellers to concentrate on developing products, creating content, and expanding their business by eliminating the logistical challenges and resource limitations of handling and scaling operations.
Sellers can choose specific products for storage and shipment via FBT without storing all their SKUs at TikTok’s warehouse or using FBT for their entire product range. Additionally, FBT provides a premium delivery service for the next working day. Sellers benefit from automated fulfillment for all orders placed up to 7PM every day of the week.
US vs UK Key Differences
The main difference, currently, is that the UK FBT is available to all sellers and the US FBT is invite-only.
Can I sign up for FBT?
Yes. Sign up for the UK FBT here and apply for the US FBT here.
How much does FBT cost?
This depends on the size of your packages, volume of orders, and market and is broken into four categories:
- Receiving Fees
- Storage Fees
- Fulfilment & Packaging Fees
- Value Add Fees
As an example, this is the rate card for services in the UK3.

If you made it this far, thank you for taking the time to read this article! If you would like to read more, feel free to click the previous/next buttons below.
- Customers will be able to view when you update the status to “Shipped” and then “Delivered” but won’t be able to track the package progress. ↩︎
- This template can be downloaded after you have been approved for Seller Shipping and can be customised based on delivery costs and capabilities. ↩︎
- Current as of the “Last Updated” date found at the top of the page. ↩︎


Leave a Reply